REVIEW · KUTA
Uluwatu Silver Class: A Unique Jewelry-Making Experience in Bali
Book on Viator →Operated by Celuk Bali Silver Class · Bookable on Viator
Making silver jewelry in Bali is surprisingly doable.
This hands-on Uluwatu Silver Class gives you step-by-step help to go from design to finished piece, even if you’ve never worked with metal before. I like the clear process (melting, shaping, soldering, sanding, polishing) and I love that you keep what you make as a true souvenir. One thing to plan for: the teaching is hands-on and friendly, but English instruction can be uneven, so you may need to ask questions slowly and directly.
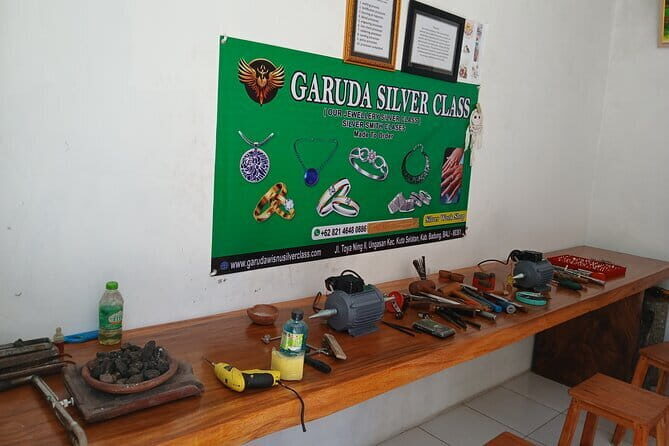
You’ll meet at Garuda Silver Class in Ungasan and finish back there, with the shop set up so you can pair this class with nearby beaches and Uluwatu-area sunset plans. Most people can join, and it’s private for your group, which helps you learn at your pace. The big tradeoff is limits: you can only make one piece, your silver amount is capped (1–5 grams), and gemstones cost extra.
In This Review
- Key points before you go
- Silver jewelry in Bali, built step by step
- Design selection and the one-piece rule
- From grains to shine: what you do during the workshop
- Picking materials and tools
- Melting and working silver
- Soldering, sanding, and polishing
- How long is it, and how fast is the pace?
- Where it fits in your Bali day: Uluwatu beaches and cultural stops
- Price and value: what $45.82 really covers
- Small snags to consider before you go
- English instruction can vary
- Your piece size is limited
- Gemstones and extra weight add costs
- Sharing silver isn’t allowed
- Who this class suits best
- Tips to get a better result (without overthinking it)
- Should you book Uluwatu Silver Class?
- FAQ
- How long does Uluwatu Silver Class take?
- How much silver will I get to take home?
- Can I add gemstones to my jewelry?
- What happens if I want more than 5 grams of silver?
- Is transportation included?
- Is it a private experience?
Key points before you go
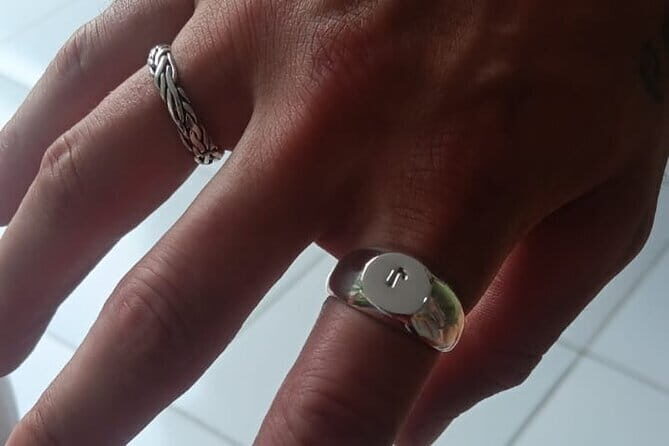
- You finish with a take-home piece: one silver item per person, designed and made by you.
- The class covers the full metal process: from melting silver grains to the final polish.
- Your silver is measured in grams: expect 1–5 grams depending on design, with 5 grams counted if you go under.
- Costs can rise with gemstones or extra weight: plan for add-ons if you want stones or more silver.
- Private, guided attention: only your group participates, so you’re not lost in a crowd.
- Location works for Uluwatu days: it’s near several famous beaches and cultural stops in the area.
Silver jewelry in Bali, built step by step
This class is basically a practical workshop with real skills. You’re not just watching someone else craft. You sit with tools, follow guidance, and actually form the jewelry yourself from start to finish.
What makes it interesting is the sequence. You’ll move through the key stages of silver work: picking a design, learning materials and tools, melting silver grains, shaping wire or plate, forming the piece, soldering, then sanding and polishing. By the end, your hands understand what the silversmiths are doing, not just what they say.
And yes, you still get to make design choices. That matters because it’s what turns the experience into a souvenir you’ll want to wear or keep in a box with pride, not a random trinket.
If you're still narrowing it down, here are other tours in Kuta we've reviewed.


Design selection and the one-piece rule
You start by selecting a design, then the instructor helps you translate that idea into a piece you can realistically finish in the session. The class is built for tourists, so the workflow is structured. Still, you’ll want to think ahead about what you can complete comfortably in the time allowed.
Here’s the big practical rule: each participant can make only one silver jewelry piece. That keeps expectations clear, but it also means there’s no hedging with multiple designs. If you want a ring and a bracelet, this is best treated as one item per person, or you book separate sessions.
Silver weight is another key detail. You’ll take home jewelry starting from 1–5 grams, and the final weight depends on your design. If your piece ends up using less than 5 grams, the usage is still accounted for as 5 grams. In other words, the class prices the experience around a 5-gram cap, even if your design uses less material.
From grains to shine: what you do during the workshop
The workshop follows the real craft steps, not a simplified demo. I like that because it makes the experience feel honest and instructive.
Picking materials and tools
After design selection, you get a quick introduction to the materials and tools. This isn’t a long lecture. It’s enough to help you handle the process without guessing.
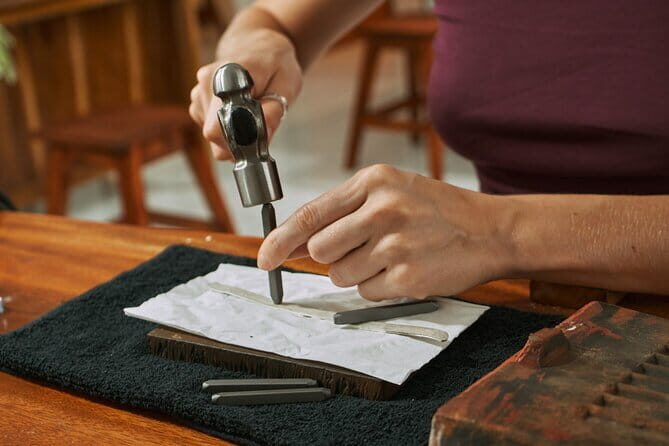
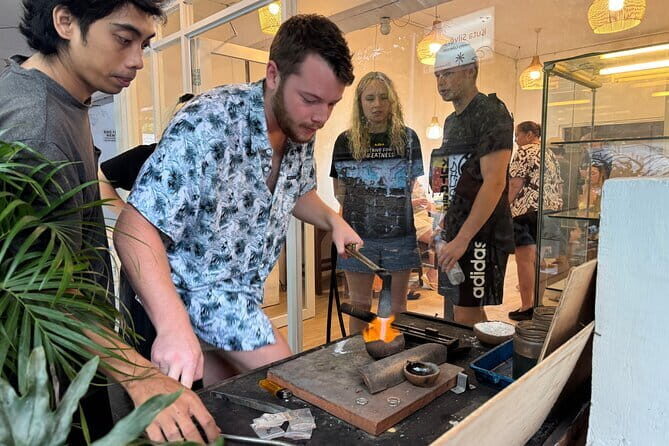
Melting and working silver
Next comes melting silver grains. This is one of the moments where guided help matters. It’s precise work, and the whole point is that you’re doing it with the silversmiths guiding you through timing and handling.
Once the silver is ready, you’ll form it into a wire or plate. From there, shaping happens based on your chosen design. You’re building the basic form that will become the final jewelry.


Soldering, sanding, and polishing
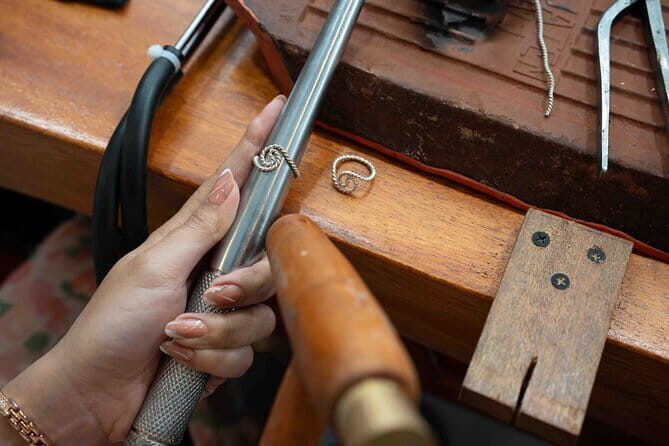
Soldering is the step where rough pieces start to become a coherent item. You’ll learn how the join works and how to make the connection hold.
Then it’s sanding and polishing. This is where you see the transformation. The piece starts looking like jewelry instead of metal scraps and it becomes something you can recognize instantly as yours.
If you care about the final look, this portion is where your patience pays off. Slow sanding and careful finishing are what make the jewelry feel clean and wearable.
How long is it, and how fast is the pace?
The class duration is roughly 1.5 to 3 hours. That range matters. You might finish closer to the shorter end if your design is straightforward, or closer to the longer end if your design takes more steps to shape and refine.
Because you have limited time, it helps to keep your design within your comfort zone. If you’re debating a complex look, remember you have to make it by hand during the session, not just pick it from a catalog.
The good news is that it’s guided throughout. You’re not left to figure out metallurgy alone. The goal is one finished piece you can take home, not a craft project that drifts into tomorrow.
Where it fits in your Bali day: Uluwatu beaches and cultural stops

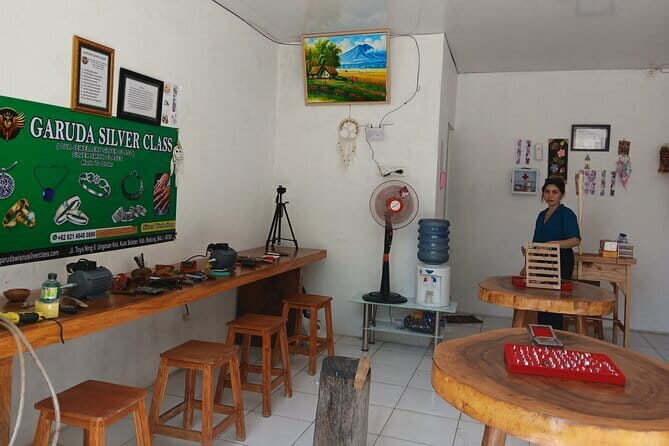
This workshop is located in Ungasan (Kuta Selatan area), with the meeting point at Garuda Silver Class on Jl. Toya Ning II. The location is near well-known coastal areas and cultural landmarks in the south Bali orbit.
That matters because you can stack plans without wasting your day in traffic. The workshop is described as being near beaches such as Balangan, Melasti, Pandawa, Nyang-Nyang, and Uluwatu. It’s also close to Garuda Wisnu Kencana Culture Park and the Kecak Dance performance at Uluwatu during sunset.
So here’s a practical way to think about scheduling:
- If you want sunset at Uluwatu, consider an earlier class so you’re not rushing afterward.
- If you’re doing coastal beach time, pair the class with a beach day either before or after, depending on how long you want to spend on the road.
Also note: the class is listed as not including shuttle. If you’re coming from farther north, you’ll likely want to plan on rideshare/taxi or your own transport. Having your own schedule flexibility is a big help here.
Price and value: what $45.82 really covers
At $45.82 per person, you’re paying for more than the silver. You’re paying for the full, guided process and the materials used to make your jewelry.
Here’s what’s included:
- All necessary materials and tools
- Snack and mineral water
- Free Wi-Fi
- Mobile ticket
- A take-home silver piece in the 1–5 gram range (with the 5-gram accounting rule if you use less)
You’re also getting a setup that supports first-timers. The steps are taught from design to finishing. In craft classes, that human guidance is where value lives. Without it, you’d only be paying for raw materials and time in a shop.
What’s not included can affect the real price:
- Gemstones cost extra, listed as IDR 100K to 500K depending on type and size.
- Extra silver weight beyond 5 grams is charged at IDR 100,000 per gram.
- No shuttle is included.
So, to judge value, think like this: your cost is stable if you keep it to a simple silver design. It grows if you add stones or want more metal. If you go in with a clear design idea and a realistic silver weight, you’ll likely feel good about the deal.
Small snags to consider before you go
This is a hands-on workshop, so a few things deserve attention.
English instruction can vary
Some people note that English of the instructor wasn’t strong enough for them to absorb everything easily. That doesn’t mean you won’t be guided. It just means you should be ready to communicate with simple questions and follow the visual steps.
Your piece size is limited
You can only make one item, and silver weight is capped. If you’re picturing a big statement piece, you’ll need to adjust expectations. This class is built around a wearable keepsake, not a massive jewelry haul.
Gemstones and extra weight add costs
Gemstones are an add-on. So is making the silver piece heavier than the limit. If you want to keep your budget predictable, treat stones and extra grams as optional upgrades, not defaults.
Sharing silver isn’t allowed
You can’t share silver with another person. This matters if you’re thinking about combining materials to create one larger piece. Plan for individual pieces instead.
Who this class suits best
I think this is a strong match for people who want a hands-on Bali activity with a real result. It’s also great if you want a souvenir that feels personal.
You’ll get the most out of it if you:
- like working with your hands and learning by doing
- want a wearable keepsake that came from your own effort
- prefer smaller, private attention rather than a large group demo
- are pairing it with a Uluwatu or south Bali day and want something creative between sightseeing stops
It’s also a good family option. One person made a ring and their son made a second one, which suggests it can work well when everyone commits to making one piece.
If you dislike structured craft steps or you want a purely passive activity, this may feel too “workshop” for your taste. But if you’re curious and patient, it’s a satisfying session.
Tips to get a better result (without overthinking it)
A few practical choices can make your finished jewelry look better.
- Choose a design that matches your patience level. Simple shapes often finish more cleanly when you’re learning.
- Ask clarifying questions early, when you still have time to adjust. If language is a bit tricky, simple requests and pointing help.
- During polishing, take your time. This is where most of the visual wow comes from.
- If gemstones are tempting, confirm the cost range before committing. The listing gives a broad IDR range, but the real number depends on the stone type and size.
And one more thing: go in ready to keep that piece. The class is designed so the jewelry is yours to take home. Treat it like something you’re making, not something you’re hoping will turn out.
Should you book Uluwatu Silver Class?
Book it if you want a real Bali craft experience where you end with a take-home silver item and you don’t want to spend your holiday only looking. The inclusion of materials, tools, and instruction makes the price feel more like a learning fee than a souvenir markup.
Skip it or rethink if you want a very complex design, a large heavy piece, or if you’re counting on detailed English explanations. The workshop runs on hands-on guidance, and you’ll do best if you’re comfortable following steps and asking direct questions.
If you’re planning a south Bali day anyway, this is the kind of activity that adds a personal story to your trip. You’ll leave with something you made, not just photos.
FAQ
How long does Uluwatu Silver Class take?
The class duration is listed as about 1.5 hours to 3 hours, depending on the session flow and your design.
How much silver will I get to take home?
You’ll take home a silver jewelry piece starting from 1–5 grams, depending on your design. If the silver used is less than 5 grams, it is still accounted for as 5 grams.
Can I add gemstones to my jewelry?
Yes, gemstones can be added for an additional charge. The listed cost range is from IDR 100K to 500K, depending on the type and size.
What happens if I want more than 5 grams of silver?
If your jewelry uses more than 5 grams, there is an additional fee of IDR 100,000 per gram.
Is transportation included?
No. Shuttle service is not included.
Is it a private experience?
Yes. This is a private tour/activity, and only your group participates.