REVIEW · KUTA
Kuta Bali Silver Jewelry Making Class Near Kuta Beach
Book on Viator →Operated by Celuk Bali Silver Class · Bookable on Viator
Kuta turns into a silversmith studio for a few hours. This Kuta Bali silver jewelry class is set on Jalan Raya Legian, near Kuta Beach, so you skip the Ubud detour and still learn real metalworking. I like the hands-on flow and the way the instructors keep you moving safely through each step, and I especially like that you leave with a one-of-a-kind silver piece you made yourself.
One thing to plan for: your silver is limited to a small take-home amount per person (the workshop says 1–5 grams depending on your design), and if you want extra weight or gemstones there are add-on charges.
In This Review
- Quick Highlights You’ll Feel Right Away
- Kuta Bali Workshop Location: Near the Beach, Not in Ubud
- What You’re Really Paying For: A Hands-On Sterling Silver Souvenir
- The Class Flow: From Design Choice to Polished Finish
- The Techniques You Learn (Even as a Total Beginner)
- Time Expectations: How 1.5 to 3 Hours Usually Works
- Group Size and the One-Piece Rule
- Included Comforts: Snack, Water, and Free Wi-Fi
- Price and Add-Ons: How to Get the Best Value
- Your Take-Home Jewelry: What You’ll Actually Walk Away With
- Tips to Make Your Piece Look Better (and Feel Like Yours)
- Who This Class Is Perfect For
- Should You Book the Kuta Bali Silver Class?
- FAQ
- Where is the meeting point for the Kuta Bali silver jewelry making class?
- How long does the class take?
- What’s included in the price?
- Can I make more than one piece?
- Is the silver sterling 925?
- How much silver will I take home?
- Can I add gemstones to my design?
- What happens if I want more than 5 grams of silver?
- Can I get a refund if plans change?
Quick Highlights You’ll Feel Right Away
- You choose the design first, then make it from scratch, with your final piece going home with you.
- A classic silversmith process: melting sterling (925), hammering/pressing, soldering/shaping, then filing and polishing.
- Patient guidance during the risky parts, while you still do the fun, creative work like shaping and polishing.
- Near Kuta Beach on Jalan Raya Legian, so it fits easily into a beach-and-shopping day.
- Small workshop feel with a maximum of 22 participants, and everyone makes only one jewelry piece.
Kuta Bali Workshop Location: Near the Beach, Not in Ubud
If you’re basing yourself around Kuta Beach, this is a smart pick because the class runs on Jalan Raya Legian (Street Jl. Raya Legian No.116). That means you don’t have to build an entire half-day around getting to Ubud for a metalworking class.
It also helps that the meeting point is described as near public transportation. So even if you’re bouncing between beach time, temples, and dinner spots, you can treat this class like an easy appointment rather than a full-day excursion.
If you're still narrowing it down, here are other tours in Kuta we've reviewed.


What You’re Really Paying For: A Hands-On Sterling Silver Souvenir

At $45.84 per person, the value here is less about watching and more about doing. You’re given the tools and materials, and you end up with a wearable item you created—an actual souvenir, not just a photo.
You’ll also be taking home silver that starts at 1–5 grams depending on your design. That matters, because many jewelry workshops either hand you a completed piece to adjust, or they stop short of giving you something you can wear confidently. Here, the intention is clear: you make something you can keep.
One more value point: the workshop includes a snack and mineral water, plus free Wi-Fi. In a place where time can get squeezed between shopping and sunsets, that little buffer is real.
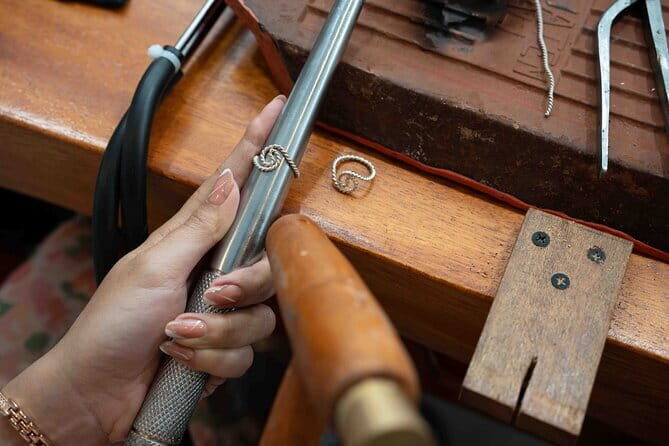
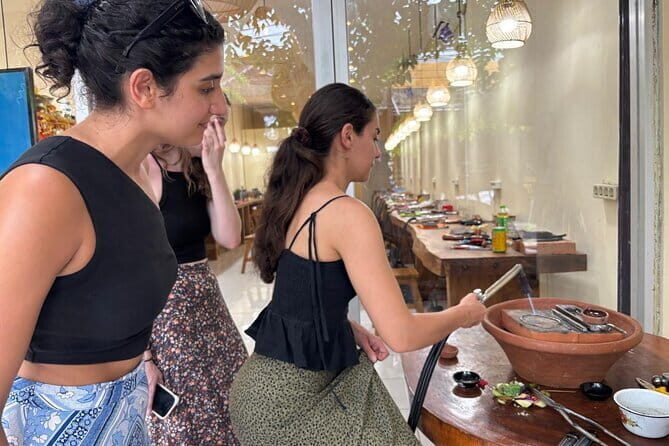
The Class Flow: From Design Choice to Polished Finish
The experience is built around a straightforward sequence. It’s not a long lecture; it’s a guided production path where you start with an idea and end with a finished piece.
Here’s the typical arc you can expect:
1) Pick your design
You’ll choose what you want to make before the metalworking begins. This is the moment to think practically: rings usually use less guesswork than complex shapes, and a simpler design can help you stay within the included silver amount.
2) Learn the materials and tools
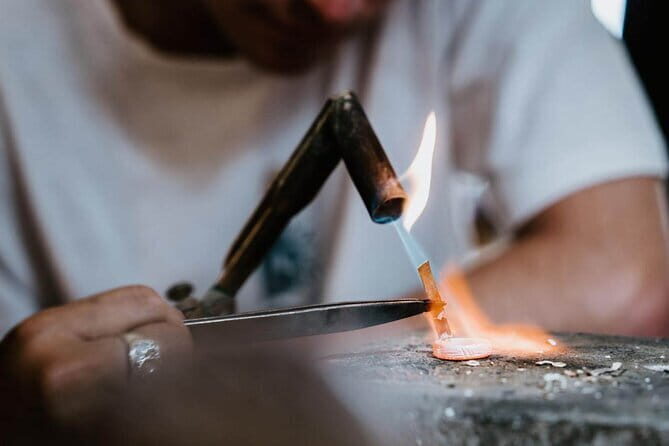
You’ll get a clear intro to the silver and the tools you’ll use. The workshop describes melting pure sterling silver (925) first, so you’ll understand what’s happening before you touch anything heat-related.
3) Melt sterling silver (925)
The class begins the metalworking step by melting the silver. This is often the part that feels most intimidating at first, but the workshop is designed so instructors guide you through the process rather than leaving you to figure it out alone.
4) Shape it: hammering and pressing
Once the silver is set up for forming, you’ll work on shaping using traditional techniques like hammering and pressing. This is where your ring (or your chosen jewelry) starts to look like something you can picture in your hand.
5) Refine it with soldering and detail shaping
As your piece takes shape, you’ll move into refinement—described as soldering and more detailed shaping. This is usually the step that turns a rough form into a proper jewelry silhouette.
6) File and polish for the finish
The last stages focus on filing and polishing. If you want your piece to look clean and gift-worthy, this finishing step is the one you’ll notice every time you look down at your new ring or pendant.
You’ll leave with your own handcrafted silver accessory. The workshop notes that each participant can make only one piece.
The Techniques You Learn (Even as a Total Beginner)

This is the kind of class that teaches you the logic behind metalwork, not just the motions. Even if you’re a first-timer, the workshop frames each technique as a necessary step toward the final look.
You’ll go through these key processes:
- Hammering and pressing to shape the metal
- Soldering to refine connections and structure
- Filing and polishing to smooth and shine the final surface
And the best part for beginners: your instructors are there for the whole journey. In the feedback, people highlight that tutors are patient and helpful, and they provide clear directions while still letting you do the exciting parts. You might see a team approach with multiple instructors working with people side-by-side—some names that come up include Artie and Martie, who are noted as helpful during the making process.
Time Expectations: How 1.5 to 3 Hours Usually Works

The class duration is listed as approximately 3 hours, but the workshop also says class duration is 1.5 to 3 hours. In practice, the time can shift depending on your chosen design and how quickly you move through the stages from melting to polishing.
That range is useful if you’re trying to fit this into a Bali day that already has beach plans. Pick a time slot that gives you breathing room after class—polishing and final checks take focus, and you’ll want time to pack up and head out without rushing.


Group Size and the One-Piece Rule
The workshop has a maximum of 22 travelers, which keeps it from turning into a crowded, assembly-line feel. Also, each participant can make only one piece, and you can’t share silver with other people. That one-piece rule keeps things fair and also keeps the instruction manageable.
For you, this means two things:
1) You should commit to one design decision up front.
2) If you’re traveling as a couple or a family, it’s worth planning who is making what, because everyone’s output is limited to their own one item.
Included Comforts: Snack, Water, and Free Wi-Fi
This class isn’t positioned as a bare-bones workshop. You’re given a snack and mineral water during the session, which makes the long part of “hands in the work” feel less tiring.
Free Wi-Fi is also included. That might sound small, but it’s helpful when you want to check maps for dinner after the class or share a quick photo with family before you head back out.
Price and Add-Ons: How to Get the Best Value
Let’s talk money without the guesswork.
The base price is $45.84 per person, and the workshop includes:
- All necessary materials and tools
- Snack and mineral water
- Free Wi-Fi
- Take-home silver jewelry starting from 1–5 grams, depending on design
Now, here’s how costs can rise if you want to customize beyond the included amount:
- Gemstones are extra: the add-on range is IDR 100K to 500K depending on type and size.
- More silver costs extra: there’s an over-weight fee of 85,000 IDR per additional gram for more than 5 grams.
- You can’t share silver with another person, so customization needs to stay within your own plan.
Practical takeaway: if you want the best value, choose a design that fits your included silver amount and keep gemstones as a decision for the day. If you go in knowing you want a heavier piece or stones, budget extra IDR so you can focus on design choices instead of second-guessing.
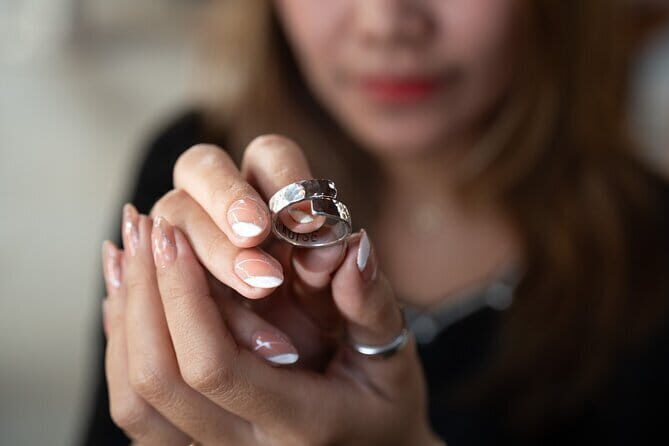
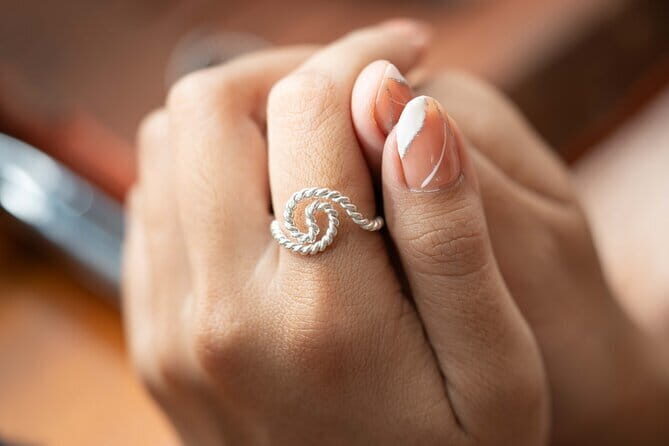
Your Take-Home Jewelry: What You’ll Actually Walk Away With
The workshop’s take-home promise is clear: you make one piece, and the silver weight is tied to your design. The description says it takes home your own silver jewelry starting from 1–5 grams, and it also notes that if your silver jewelry is less than 5 grams, the usage still gets accounted for as 5 grams.
That detail matters because it signals you’re not going to be punished for choosing a smaller design. You should still end up with a piece intended to be wearable and meaningful.
Also, because the jewelry you make is directly yours, this is a great souvenir if you care about craftsmanship and want something personal rather than mass-produced.
Tips to Make Your Piece Look Better (and Feel Like Yours)
You’ll get the most out of this class if you show up with a plan—nothing complicated, just clarity.
Here are a few smart moves:
- Decide your design early so your time goes into shaping and polishing, not debating on the fly.
- Think about realism: if you’re new to metalwork, a simpler shape can help the process stay smooth within the allotted silver.
- Use the instructors’ help at every step you’re unsure about. The feedback repeatedly notes how patient and supportive the tutors are, and that guidance is exactly what helps beginners produce something they’ll actually want to wear.
- Plan for gemstones only if you truly want them. You can buy gemstones on the day, but the workshop lists a wide IDR price range, so it’s better to treat stones as a deliberate upgrade.
Who This Class Is Perfect For
This is a strong match if you:
- Want a hands-on silver jewelry souvenir without spending the day commuting to Ubud
- Love activities where you can see progress quickly
- Are traveling as a couple or small group and want something memorable to bring home
- Like structured guidance but still want to do the “real work” like melting, shaping, and polishing
It may not be ideal if you:
- Want to make multiple pieces in one visit (the class limits each participant to one piece)
- Have a tight budget and also want gemstones or extra silver weight without add-on costs
- Expect a longer cultural workshop experience beyond the making process
Should You Book the Kuta Bali Silver Class?
I think this is worth booking if you want a legit craft souvenir and you’ll enjoy learning with your hands. The biggest reason: you’re not just observing—you’re shaping and finishing your own sterling (925) piece, guided by patient instructors and supported throughout the steps.
Book it if you’re staying near Kuta Beach and want something meaningful that fits into a 1.5–3 hour block. It’s also a great choice for beginners because the process is laid out clearly from melting to polishing.
Skip it (or go in with your expectations adjusted) if you’re chasing a big, expensive jewelry outcome. Your take-home silver is modest by design, and upgrades for gemstones or extra grams come with additional IDR fees.
FAQ
Where is the meeting point for the Kuta Bali silver jewelry making class?
The meeting point is Street Jl. Raya Legian No.116, Kuta, Kec. Kuta, Kota Denpasar, Bali 80361, Indonesia. The activity ends back at the meeting point.
How long does the class take?
The class duration is listed as about 3 hours, and also as 1.5 to 3 hours. The exact timing can vary based on the process and the piece you choose.
What’s included in the price?
The class includes all necessary materials and tools, a snack, mineral water, and free Wi-Fi. You also take home your own silver jewelry (starting from 1–5 grams depending on design).
Can I make more than one piece?
No. The workshop states that each participant can make only one silver jewelry piece.
Is the silver sterling 925?
Yes. The process described includes melting pure sterling silver (925).
How much silver will I take home?
You’ll take home jewelry starting from 1–5 grams, depending on your design. If your jewelry is less than 5 grams, the usage is still accounted for as 5 grams.
Can I add gemstones to my design?
Yes. You can buy gemstones on the day if you want them, and the additional charge is listed as IDR 100K to 500K depending on type and size.
What happens if I want more than 5 grams of silver?
If you want more than 5 grams, there’s an over weight limit additional fee of 85,000 IDR per gram for more than 5 grams.
Can I get a refund if plans change?
Free cancellation is available up to 24 hours in advance for a full refund. If you cancel less than 24 hours before the start time, the amount you paid will not be refunded.